LoadData相关讲解
glide编码流程主要是通过ModelLoader、LoadData等类进行完成的,下面先介绍这几个类的类图关系:

ModelLoader 是用来构建LoadData,而LoadData中对应了不同的DataFetcher,DataFetcher是最终加载数据层。
在上一节中介绍过SourceGenerator在startNext方法中fetcher是HttpUrlFetcher,以及在获取到数据后,进行保存到磁盘,然后调用了DataCacheGenerator的startNext方法,然后在里面用到了ByteBufferFetcher,它们都是怎么来的呢?下面通过源码分析如何获取的:
 1
 2
 3
 4
 5
 6
 7
 8
 9
10
11
12
13
14
15
|
class SourceGenerator{
  public void startNext(){
    loadData = null;
    boolean started = false;
    while (!started && hasNextModelLoader()) {
      loadData = helper.getLoadData().get(loadDataListIndex++);
      if (loadData != null
          && (helper.getDiskCacheStrategy().isDataCacheable(loadData.fetcher.getDataSource())
              || helper.hasLoadPath(loadData.fetcher.getDataClass()))) {
        started = true;
        startNextLoad(loadData);
      }
    }
  }
}
|
在SourceGenerator的startNext方法中有上面代码,首先通过hasNextModelLoader方法判断有没有合适的LoadData:
1
2
3
|
private boolean hasNextModelLoader() {
  return loadDataListIndex < helper.getLoadData().size();
}
|
判断当前索引是否小于helper获取的loadData的数量,helper是DecodeHelper辅助类,它是在DecodeJob中初始化的:
 1
 2
 3
 4
 5
 6
 7
 8
 9
10
11
12
13
14
15
|
List<LoadData<?>> getLoadData() {
  if (!isLoadDataSet) {
    isLoadDataSet = true;
    loadData.clear();
    List<ModelLoader<Object, ?>> modelLoaders = glideContext.getRegistry().getModelLoaders(model);
    for (int i = 0, size = modelLoaders.size(); i < size; i++) {
      ModelLoader<Object, ?> modelLoader = modelLoaders.get(i);
      LoadData<?> current = modelLoader.buildLoadData(model, width, height, options);
      if (current != null) {
        loadData.add(current);
      }
    }
  }
  return loadData;
}
|
glideContext是glide统一的上下文,它继承自ContextWrapper,是在Glide对象初始化的时候创建的,接着调用了getRegistry方法,该方法的定义如下:
 1
 2
 3
 4
 5
 6
 7
 8
 9
10
11
12
13
14
15
16
17
18
19
20
21
22
23
24
25
26
27
28
29
30
31
32
33
34
35
|
public final class GlideSuppliers {
  public interface GlideSupplier<T> {
    T get();
  }

  private GlideSuppliers() {}

  public static <T> GlideSupplier<T> memorize(final GlideSupplier<T> supplier) {
    return new GlideSupplier<T>() {
      private volatile T instance;

      @Override
      public T get() {
        if (instance == null) {
          synchronized (this) {
            if (instance == null) {
              instance = Preconditions.checkNotNull(supplier.get());
            }
          }
        }
        return instance;
      }
    };
  }
}
public class GlideContext{
  private final GlideSupplier<Registry> registry;
  public GlideContext(@NonNull Context context,@NonNull GlideSupplier<Registry> registry) {
    super(context.getApplicationContext());
    this.registry = GlideSuppliers.memorize(registry);
  }
  public Registry getRegistry() {
    return registry.get();
  }
}
|
getRegistry方法中是调用了GlideContext的registry变量的get方法,而registry变量是通过GlideSuppliers.memorize构建的,GlideSupplier是一个接口,定义了get方法,而在GlideSuppliers.memorize方法中返回的GlideSupplier对象中重写的get方法是通过memorize方法supplier参数的get来获取的。也就是说创建GlideSupplier对象交给了外界来创建。为什么在memorize方法中不直接返回supplier.get()呢?而需要在memorize包装一个匿名的GlideSupplier,这是因为在业务层多处调用GlideContext的getRegistry方法,如果在memorize方法中直接调用supplier.get(),那么每次返回新的Registry实例,所以在memorize方法中定义了一个匿名的GlideSupplier,在它的get方法里面通过双重加锁来控制单一的Registry实例。外界传进来的GlideSupplier是在创建Glide对象的时候构建的:
1
2
3
4
|
Glide(@NonNull Context context) {
    GlideSupplier<Registry> registry = RegistryFactory.lazilyCreateAndInitializeRegistry(this, manifestModules, annotationGeneratedModule);
    glideContext =new GlideContext(context,registry);
}
|
外界传进来的GlideSupplier是通过RegistryFactory.lazilyCreateAndInitializeRegistry来创建的:
 1
 2
 3
 4
 5
 6
 7
 8
 9
10
11
12
13
14
15
16
17
|
static GlideSupplier<Registry> lazilyCreateAndInitializeRegistry(){
  return createAndInitRegistry(glide, manifestModules, annotationGeneratedModule);
}

static Registry createAndInitRegistry(
    Glide glide,
    List<GlideModule> manifestModules,
    @Nullable AppGlideModule annotationGeneratedModule) {
  BitmapPool bitmapPool = glide.getBitmapPool();
  ArrayPool arrayPool = glide.getArrayPool();
  Context context = glide.getGlideContext().getApplicationContext();
  GlideExperiments experiments = glide.getGlideContext().getExperiments();
  Registry registry = new Registry();
  initializeDefaults(context, registry, bitmapPool, arrayPool, experiments);
  initializeModules(context, glide, registry, manifestModules, annotationGeneratedModule);
  return registry;
}
|
这样将Registry的初始化交给了RegistryFactory来创建,所有的配置收拢到一块,更加聚合。回到上面DecodeHelper的getLoadData方法,接着调用了Registry的getModelLoaders方法:
1
2
3
|
public <Model> List<ModelLoader<Model, ?>> getModelLoaders(@NonNull Model model) {
  return modelLoaderRegistry.getModelLoaders(model);
}
|
modelLoaderRegistry是在Registry中初始化的,看下它的getModelLoaders方法:
 1
 2
 3
 4
 5
 6
 7
 8
 9
10
11
12
13
14
15
16
17
18
19
20
21
22
23
24
25
26
27
|
public <A> List<ModelLoader<A, ?>> getModelLoaders(@NonNull A model) {
  List<ModelLoader<A, ?>> modelLoaders = getModelLoadersForClass(getClass(model));
  int size = modelLoaders.size();
  boolean isEmpty = true;
  List<ModelLoader<A, ?>> filteredLoaders = Collections.emptyList();
  for (int i = 0; i < size; i++) {
    ModelLoader<A, ?> loader = modelLoaders.get(i);
    if (loader.handles(model)) {
      if (isEmpty) {
        filteredLoaders = new ArrayList<>(size - i);
        isEmpty = false;
      }
      filteredLoaders.add(loader);
    }
  }
  return filteredLoaders;
}

private synchronized <A> List<ModelLoader<A, ?>> getModelLoadersForClass(
    @NonNull Class<A> modelClass) {
  List<ModelLoader<A, ?>> loaders = cache.get(modelClass);
  if (loaders == null) {
    loaders = Collections.unmodifiableList(multiModelLoaderFactory.build(modelClass));
    cache.put(modelClass, loaders);
  }
  return loaders;
}
|
在getModelLoaders通过model的Class类型,调用了getModelLoadersForClass方法,在该方法里面从cache里面取拿ModelLoader集合,它是包装map的ModelLoaderCache类,首次为空,接着调用了multiModelLoaderFactory.build(modelClass)把loaders放到cache中。注意下,该方法中使用Collections.unmodifiableList包装了一层集合,该集合不允许进行添加元素,主要是为了不让后续添加新的ModelLoader,防止在边遍历的时候会有其他地方添加元素而产生ConcurrentModificationException异常。并且此处使用了cache缓存,下次直接从该map中取该model下的ModelLoader集合,无需再次进行构建。看下该方法怎么获取loaders的:
 1
 2
 3
 4
 5
 6
 7
 8
 9
10
11
12
13
14
15
16
17
18
19
|
synchronized <Model> List<ModelLoader<Model, ?>> build(@NonNull Class<Model> modelClass) {
  try {
    List<ModelLoader<Model, ?>> loaders = new ArrayList<>();
    for (Entry<?, ?> entry : entries) {
      if (alreadyUsedEntries.contains(entry)) {
        continue;
      }
      if (entry.handles(modelClass)) {
        alreadyUsedEntries.add(entry);
        loaders.add(this.<Model, Object>build(entry));
        alreadyUsedEntries.remove(entry);
      }
    }
    return loaders;
  } catch (Throwable t) {
    alreadyUsedEntries.clear();
    throw t;
  }
}
|
entries是Entry对象的集合,注意了上面使用了alreadyUsedEntries集合标记Entry有没有被构建,比如在构建a这个modelLoader中又去构建b这个modelLoader,而在b中又去构建a,这就导致循环构建,此时通过该集合能解决这个循环依赖问题,以及解决重复构建的问题,比如在a中需要构建b,那下次构建b的时候就无需再次构建了。Entry对象里面存储了modelClass、dataClass、modelLoaderFactory:
1
2
3
4
5
|
private static class Entry<Model, Data> {
  private final Class<Model> modelClass;
  @Synthetic final Class<Data> dataClass;
  @Synthetic final ModelLoaderFactory<? extends Model, ? extends Data> factory;
}
|
而entries集合中的Entry元素是在上面分析Registry对象创建过程中的RegistryFactory中添加进来的:
1
2
3
4
5
6
7
8
9
|
public class RegistryFactory{
  private static void initializeDefaults(Registry registry){
  registry
        .append(String.class, InputStream.class, new DataUrlLoader.StreamFactory<String>())
        .append(String.class, InputStream.class, new StringLoader.StreamFactory())
        .append(String.class, ParcelFileDescriptor.class, new StringLoader.FileDescriptorFactory())
        .append(String.class, AssetFileDescriptor.class, new StringLoader.AssetFileDescriptorFactory())
  }
}
|
append方法三个参数对应分别对应了上面Entry对象的modelClass、dataClass、ModelLoaderFactory,所以在上面multiModelLoaderFactory的build方法中遍历entries时候,通过entry的handles(modelClass)来进行过滤:
1
2
3
|
public boolean handles(@NonNull Class<?> modelClass) {
  return this.modelClass.isAssignableFrom(modelClass);
}
|
如果传进来的是String类型,则会过滤出上面4个通过append方法构建的Entry对象,接着会调用multiModelLoaderFactory的build(entry)方法:
1
2
3
|
private <Model, Data> ModelLoader<Model, Data> build(@NonNull Entry<?, ?> entry) {
  return (ModelLoader<Model, Data>) Preconditions.checkNotNull(entry.factory.build(this));
}
|
通过entry的factory的build方法创建ModelLoader,上面4个entry的factory分别是 DataUrlLoader.StreamFactory 、 StringLoader.StreamFactory 、 StringLoader.FileDescriptorFactory 、 StringLoader.AssetFileDescriptorFactory ,分别调用它们的build方法创建不同的ModelLoader:
1
2
3
|
public ModelLoader<Model, InputStream> build(@NonNull MultiModelLoaderFactory multiFactory) {
  return new DataUrlLoader<>(opener);
}
|
所以返回了4个ModelLoader分别是DataUrlLoader、StringLoader、StringLoader、StringLoader。继续回到ModelLoaderRegistry的getModelLoaders方法,接着通过ModelLoader的handles(modelClass)来过滤,DataUrlLoader的handles方法如下:
1
2
3
4
5
|
private static final String DATA_SCHEME_IMAGE = "data:image";
@Override
public boolean handles(@NonNull Model model) {
  return model.toString().startsWith(DATA_SCHEME_IMAGE);
}
|
DataUrlLoader中必须要求model是以 data:image 开头才行,而StringLoader的handles(modelClass)如下:
1
2
3
4
|
@Override
public boolean handles(@NonNull String model) {
  return true;
}
|
所以modelLoaderRegistry的getModelLoaders方法返回后面3个StringLoader了。继续回到DecodeJob的getLoadData方法,获取到3个ModelLoader后,继续调用它们的buildLoadData方法来获取LoadData,它们都是StringLoader,来看下它的buildLoadData方法:
1
2
3
4
5
6
7
8
9
|
@Override
public LoadData<Data> buildLoadData(
    @NonNull String model, int width, int height, @NonNull Options options) {
  Uri uri = parseUri(model);
  if (uri == null || !uriLoader.handles(uri)) {
    return null;
  }
  return uriLoader.buildLoadData(uri, width, height, options);
}
|
首先将model转化成uri,然后调用uriLoader.handles(uri)过滤,在StringLoader中的uriLoader是一个MultiModelLoader(继承自ModelLoader,这其实就是个代理模式,将创建LoadData交给了外界传来的ModelLoader),它是在创建StringLoader的时候传进来的,比如第一个StringLoader创建如下:
 1
 2
 3
 4
 5
 6
 7
 8
 9
10
11
12
13
14
15
16
17
18
19
20
21
22
23
24
25
26
27
28
29
30
31
32
33
34
35
36
37
38
39
40
41
42
43
44
45
46
47
48
49
50
51
52
53
|
public static class StreamFactory implements ModelLoaderFactory<String, InputStream> {
  @NonNull
  @Override
  public ModelLoader<String, InputStream> build(@NonNull MultiModelLoaderFactory multiFactory) {
    return new StringLoader<>(multiFactory.build(Uri.class, InputStream.class));
  }
}

public synchronized <Model, Data> ModelLoader<Model, Data> build(
    @NonNull Class<Model> modelClass, @NonNull Class<Data> dataClass) {
  try {
    List<ModelLoader<Model, Data>> loaders = new ArrayList<>();
    boolean ignoredAnyEntries = false;
    for (Entry<?, ?> entry : entries) {
      if (alreadyUsedEntries.contains(entry)) {
        ignoredAnyEntries = true;
        continue;
      }
      if (entry.handles(modelClass, dataClass)) {
        alreadyUsedEntries.add(entry);
        loaders.add(this.<Model, Data>build(entry));
        alreadyUsedEntries.remove(entry);
      }
    }
    if (loaders.size() > 1) {
      return factory.build(loaders, throwableListPool);
    } else if (loaders.size() == 1) {
      return loaders.get(0);
    } else {
      if (ignoredAnyEntries) {
        return emptyModelLoader();
      } else {
        throw new NoModelLoaderAvailableException(modelClass, dataClass);
      }
    }
  } catch (Throwable t) {
    alreadyUsedEntries.clear();
    throw t;
  }
}

public boolean handles(@NonNull Class<?> modelClass, @NonNull Class<?> dataClass) {
  return handles(modelClass) && this.dataClass.isAssignableFrom(dataClass);
}

static class Factory {
  @NonNull
  public <Model, Data> MultiModelLoader<Model, Data> build(
      @NonNull List<ModelLoader<Model, Data>> modelLoaders,
      @NonNull Pool<List<Throwable>> throwableListPool) {
    return new MultiModelLoader<>(modelLoaders, throwableListPool);
  }
}
|
上面MultiModelLoaderFactory的build两参(modelClass和dataClass)和前面介绍的单参build方法其实类似,只不过这里可能会创建一个MultiModelLoader,其实这里就是ModelLoader的依赖构建。直接看三个StringLoader的构建结果:
- StringLoader:uriLoader = MultiModelLoader(modelLoaders=
[DataUrlLoader, AssetUriLoader, MediaStoreImageThumbLoader, MediaStoreVideoThumbLoader, QMediaStoreUriLoader, UriLoader, UrlUriLoader, UrlUriLoader])
- StringLoader:uriLoader = MultiModelLoader(modelLoaders=
[QMediaStoreUriLoader, UriLoader])
- StringLoader:uriLoader = MultiModelLoader(modelLoaders=
[ResourceUriLoader, AssetUriLoader, UriLoader])
所以经过StringLoader的uriLoader(MultiModelLoader)的handles方法过滤:
1
2
3
4
5
6
7
8
9
|
@Override
public boolean handles(@NonNull Model model) {
  for (ModelLoader<Model, Data> modelLoader : modelLoaders) {
    if (modelLoader.handles(model)) {
      return true;
    }
  }
  return false;
}
|
遍历modelLoaders,然后调用每一个modelLoader的handles方法,最终只有第一个StringLoader通过,是因为UrlUriLoader的handles方法通过:
1
2
3
4
5
6
7
8
|
public class UrlUriLoader<Data> implements ModelLoader<Uri, Data> {
  private static final Set<String> SCHEMES =
      Collections.unmodifiableSet(new HashSet<>(Arrays.asList("http", "https")));
  @Override
  public boolean handles(@NonNull Uri uri) {
    return SCHEMES.contains(uri.getScheme());
  }
}
|
继续回到StringLoader的buildLoadData方法,接着会调用uriLoader.buildLoadData的方法,也就是MultiModelLoader的方法:
 1
 2
 3
 4
 5
 6
 7
 8
 9
10
11
12
13
14
15
16
17
18
19
|
public LoadData<Data> buildLoadData(
    @NonNull Model model, int width, int height, @NonNull Options options) {
  Key sourceKey = null;
  int size = modelLoaders.size();
  List<DataFetcher<Data>> fetchers = new ArrayList<>(size);
  for (int i = 0; i < size; i++) {
    ModelLoader<Model, Data> modelLoader = modelLoaders.get(i);
    if (modelLoader.handles(model)) {
      LoadData<Data> loadData = modelLoader.buildLoadData(model, width, height, options);
      if (loadData != null) {
        sourceKey = loadData.sourceKey;
        fetchers.add(loadData.fetcher);
      }
    }
  }
  return !fetchers.isEmpty() && sourceKey != null
      ? new LoadData<>(sourceKey, new MultiFetcher<>(fetchers, exceptionListPool))
      : null;
}
|
最终交给了UrlUriLoader的buildLoadData方法获取LoadData:
1
2
3
4
5
|
public LoadData<Data> buildLoadData(
    @NonNull Uri uri, int width, int height, @NonNull Options options) {
  GlideUrl glideUrl = new GlideUrl(uri.toString());
  return urlLoader.buildLoadData(glideUrl, width, height, options);
}
|
它又交给了urlLoader的buildLoadData方法获取LoadData,此处的urlLoader实际是HttpGlideUrlLoader,它是在UrlUriLoader创建的时候获取的:
 1
 2
 3
 4
 5
 6
 7
 8
 9
10
11
12
13
|
public LoadData<InputStream> buildLoadData(
    @NonNull GlideUrl model, int width, int height, @NonNull Options options) {
  GlideUrl url = model;
  if (modelCache != null) {
    url = modelCache.get(model, 0, 0);
    if (url == null) {
      modelCache.put(model, 0, 0, model);
      url = model;
    }
  }
  int timeout = options.get(TIMEOUT);
  return new LoadData<>(url, new HttpUrlFetcher(url, timeout));
}
|
所以最终的LoadData是此处创建的,fetcher是HttpUrlFetcher。
为什么Glide在创建ModelLoader的时候不直接在registry阶段不直接把对应的ModelLoader组装成Entry,而要通过ModelLoaderFactory来创建ModelLoader?
上面说过ModelLoader的创建可能依赖其它的ModelLoader,如果把ModelLoader直接创建出来,相当于把依赖的ModelLoader也创建出来了,这样会把一些不使用的ModelLoader也创建出来了,结果就是创建一些无用的ModelLoader出来,那样内存也会增加很大,而用ModelLoaderFactory的形式注册,只需要注册一个空的ModelLoaderFactory就行,内存上得到控制。
在前面分析加载流程的时候,讲过SourceGenerator获取到InputStream后,将该InputStream保存到本地文件中,这个过程涉及到一次编码,然后将文件转成byteBuffer后,完成bitmap的解码,最后将bitmap又进行一次编码,这一次是对缩放后的图片进行编码。我们先看下SourceGenerator中如何将InputStream保存到本地文件,首先看下SourceGenerator的startNext方法:
 1
 2
 3
 4
 5
 6
 7
 8
 9
10
11
12
13
14
15
16
|
class SourceGenerator{
  public boolean startNext() {
    if (dataToCache != null) {
      Object data = dataToCache;
      dataToCache = null;
      boolean isDataInCache = cacheData(data);
      if (!isDataInCache) {
        return true;
      }
    }

    if (sourceCacheGenerator != null && sourceCacheGenerator.startNext()) {
      return true;
    }
  }
}
|
HttpUrlFetcher回调到SourceGenerator后,dataToCache就不为空了,所以会调用cacheData(InputStream)保存到本地磁盘:
 1
 2
 3
 4
 5
 6
 7
 8
 9
10
11
12
13
14
15
16
17
|
private boolean cacheData(Object dataToCache) throws IOException {
  DataRewinder<Object> rewinder = helper.getRewinder(dataToCache);
  Object data = rewinder.rewindAndGet();
  Encoder<Object> encoder = helper.getSourceEncoder(data);
  DataCacheWriter<Object> writer = new DataCacheWriter<>(encoder, data, helper.getOptions());
  DataCacheKey newOriginalKey = new DataCacheKey(loadData.sourceKey, helper.getSignature());
  DiskCache diskCache = helper.getDiskCache();
  diskCache.put(newOriginalKey, writer);

  if (diskCache.get(newOriginalKey) != null) {
    originalKey = newOriginalKey;
    sourceCacheGenerator =
        new DataCacheGenerator(Collections.singletonList(loadData.sourceKey), helper, this);
    return true;
  }
  return false;
}
|
helper是DecodeHelper,调用了getRewinder方法:
 1
 2
 3
 4
 5
 6
 7
 8
 9
10
11
12
13
14
15
16
17
18
19
20
21
22
23
24
25
26
27
28
29
|
public class DecodeHelper{
  <T> DataRewinder<T> getRewinder(T data) {
    return glideContext.getRegistry().getRewinder(data);
  }
}
public class Registry{
  public <X> DataRewinder<X> getRewinder(@NonNull X data) {
    return dataRewinderRegistry.build(data);
  }
}

public class DataRewinderRegistry{
  private final Map<Class<?>, DataRewinder.Factory<?>> rewinders = new HashMap<>();
  public synchronized <T> DataRewinder<T> build(@NonNull T data) {
    DataRewinder.Factory<T> result = (DataRewinder.Factory<T>) rewinders.get(data.getClass());
    if (result == null) {
      for (DataRewinder.Factory<?> registeredFactory : rewinders.values()) {
        if (registeredFactory.getDataClass().isAssignableFrom(data.getClass())) {
          result = (DataRewinder.Factory<T>) registeredFactory;
          break;
        }
      }
    }
    if (result == null) {
      result = (DataRewinder.Factory<T>) DEFAULT_FACTORY;
    }
    return result.build(data);
  }
}
|
DataRewinder是一个接口,这里获取DataRewinder类似上面介绍的ModelLoader,上面是将Entry装载到MultiModelLoaderFactory中,而此处是将 DataRewinder.Factory 放到DataRewinderRegistry中,通过比较class类型得到DataRewinder,最终得到一个 InputStreamRewinder ,接着调用了rewindAndGet方法:
 1
 2
 3
 4
 5
 6
 7
 8
 9
10
11
12
13
14
15
16
17
18
19
|
public final class InputStreamRewinder implements DataRewinder<InputStream> {
  // 5MB.
  private static final int MARK_READ_LIMIT = 5 * 1024 * 1024;

  private final RecyclableBufferedInputStream bufferedStream;

  @Synthetic
  public InputStreamRewinder(InputStream is, ArrayPool byteArrayPool) {
    bufferedStream = new RecyclableBufferedInputStream(is, byteArrayPool);
    bufferedStream.mark(MARK_READ_LIMIT);
  }

  @NonNull
  @Override
  public InputStream rewindAndGet() throws IOException {
    bufferedStream.reset();
    return bufferedStream;
  }
}
|
在初始化InputStreamRewinder时候,将传进来的InputStream包装成RecyclableBufferedInputStream,相较于java中的BufferedInputStream,它是一个从byteArrayPool中申请byte[]数组的流,并且申请的默认byte[]数组大小是64KB,每次在扩容的时候,不是通过new byte[]的形式申请内存,而是通过byteArrayPool获取,申请到新的内存后会将旧的内存放到byteArrayPool中。基于以上特性能看出来,RecyclableBufferedInputStream是一个内存能循环利用的字节输入流,减少了GC。
DataRewinder类图:

接着通过DecodeHelper的getSourceEncoder方法获取到Encoder,跟上面获取DataRewinder是一样的,它是通过Registry到EncoderRegistry,然后也是比较传进来的class类型是不是注册的class子类型:
 1
 2
 3
 4
 5
 6
 7
 8
 9
10
11
12
13
14
15
16
17
18
19
20
21
22
23
24
25
26
27
28
29
30
31
32
33
34
35
36
|
public class Registry {
  public <X> Encoder<X> getSourceEncoder(@NonNull X data) {
    Encoder<X> encoder = encoderRegistry.getEncoder((Class<X>) data.getClass());
    if (encoder != null) {
      return encoder;
    }
  }
}
public class EncoderRegistry {
  private final List<Entry<?>> encoders = new ArrayList<>();

  @SuppressWarnings("unchecked")
  @Nullable
  public synchronized <T> Encoder<T> getEncoder(@NonNull Class<T> dataClass) {
    for (Entry<?> entry : encoders) {
      if (entry.handles(dataClass)) {
        return (Encoder<T>) entry.encoder;
      }
    }
    return null;
  }

  private static final class Entry<T> {
    private final Class<T> dataClass;
    final Encoder<T> encoder;

    Entry(@NonNull Class<T> dataClass, @NonNull Encoder<T> encoder) {
      this.dataClass = dataClass;
      this.encoder = encoder;
    }

    boolean handles(@NonNull Class<?> dataClass) {
      return this.dataClass.isAssignableFrom(dataClass);
    }
  }
}
|
所以最终Encoder是一个StreamEncoder,回到上面的cacheData方法,DecodeHelper的getDiskCache方法会通过LazyDiskCacheProvider的getDiskCache方法返回DiskCache:
 1
 2
 3
 4
 5
 6
 7
 8
 9
10
11
12
13
14
15
16
17
18
|
private static class LazyDiskCacheProvider implements DecodeJob.DiskCacheProvider {
  private final DiskCache.Factory factory;
  private volatile DiskCache diskCache;
  @Override
  public DiskCache getDiskCache() {
    if (diskCache == null) {
      synchronized (this) {
        if (diskCache == null) {
          diskCache = factory.build();
        }
        if (diskCache == null) {
          diskCache = new DiskCacheAdapter();
        }
      }
    }
    return diskCache;
  }
}
|
从此处看先通过 DiskCache.Factory 的build方法创建DiskCache,如果没有创建成功, 则返回DiskCacheAdapter。此处的DiskCache. Factory是在GlideBuilder中初始化Glide时候初始化的,它是InternalCacheDiskCacheFactory,它是继承自DiskLruCacheFactory,看下它的build方法:
 1
 2
 3
 4
 5
 6
 7
 8
 9
10
11
|
@Override
public DiskCache build() {
  File cacheDir = cacheDirectoryGetter.getCacheDirectory();
  if (cacheDir == null) {
    return null;
  }
  if (cacheDir.isDirectory() || cacheDir.mkdirs()) {
    return DiskLruCacheWrapper.create(cacheDir, diskCacheSize);
  }
  return null;
}
|
可以看到最终是通过DiskLruCacheWrapper的create方法来创建DiskCache:
1
2
3
|
public static DiskCache create(File directory, long maxSize) {
  return new DiskLruCacheWrapper(directory, maxSize);
}
|
所以上面cacheData中diskCache是一个DiskLruCacheWrapper对象。最终通过DiskLruCacheWrapper的put方法来保存到文件:
 1
 2
 3
 4
 5
 6
 7
 8
 9
10
11
12
13
14
15
16
17
18
|
@Override
public void put(Key key, Writer writer) {
  String safeKey = safeKeyGenerator.getSafeKey(key);
  DiskLruCache diskCache = getDiskCache();
  Value current = diskCache.get(safeKey);
  if (current != null) {
    return;
  }
  DiskLruCache.Editor editor = diskCache.edit(safeKey);
  if (editor == null) {
    throw new IllegalStateException("Had two simultaneous puts for: " + safeKey);
  }
  File file = editor.getFile(0);
  if (writer.write(file)) {
    editor.commit();
  }
  editor.abortUnlessCommitted();
}
|
首先通过GlideUrl获取唯一key,因为此处是保存原始文件,所以是url作为唯一key,如果能找到本地图片,则不进行保存。接着获取该文件的editor:
 1
 2
 3
 4
 5
 6
 7
 8
 9
10
11
12
13
14
15
16
17
18
19
20
21
22
23
24
25
26
|
public Editor edit(String key) throws IOException {
  return edit(key, ANY_SEQUENCE_NUMBER);
}
private synchronized Editor edit(String key, long expectedSequenceNumber) throws IOException {
  checkNotClosed();
  Entry entry = lruEntries.get(key);
  if (expectedSequenceNumber != ANY_SEQUENCE_NUMBER && (entry == null
      || entry.sequenceNumber != expectedSequenceNumber)) {
    return null; // Value is stale.
  }
  if (entry == null) {
    entry = new Entry(key);
    lruEntries.put(key, entry);
  } else if (entry.currentEditor != null) {
    return null; // Another edit is in progress.
  }
  Editor editor = new Editor(entry);
  entry.currentEditor = editor;
  // Flush the journal before creating files to prevent file leaks.
  journalWriter.append(DIRTY);
  journalWriter.append(' ');
  journalWriter.append(key);
  journalWriter.append('\n');
  flushWriter(journalWriter);
  return editor;
}
|
在上面edit方法中,判断期望的序列号如果不是默认序列号并且entry为空或者已经保存成功了则直接返回null。下面就是创建Editor和Entry的过程。创建完Editor后就是使用writer的write方法保存图片的输入流了。此处的writer是DataCacheWriter:
 1
 2
 3
 4
 5
 6
 7
 8
 9
10
11
12
13
14
15
16
|
class DataCacheWriter<DataType> implements DiskCache.Writer {
  private final Encoder<DataType> encoder;
  private final DataType data;
  private final Options options;

  DataCacheWriter(Encoder<DataType> encoder, DataType data, Options options) {
    this.encoder = encoder;
    this.data = data;
    this.options = options;
  }

  @Override
  public boolean write(@NonNull File file) {
    return encoder.encode(data, file, options);
  }
}
|
会调用encoder的encode方法,可以看出来这是编码的核心,上面分析过encoder是StreamEncoder:
 1
 2
 3
 4
 5
 6
 7
 8
 9
10
11
12
13
|
public boolean encode(@NonNull InputStream data, @NonNull File file, @NonNull Options options) {
  byte[] buffer = byteArrayPool.get(ArrayPool.STANDARD_BUFFER_SIZE_BYTES, byte[].class);
  boolean success = false;
  OutputStream os = new FileOutputStream(file);
  int read;
  while ((read = data.read(buffer)) != -1) {
    os.write(buffer, 0, read);
  }
  os.close();
  success = true;
  byteArrayPool.put(buffer);
  return success;
}
|
这就是编码的核心了,通过从字节池子中获取一个临时的byte数组,每次从输入流中读取,读取后通过输出流将buffer数组写到文件中,写完后,并回收该byte数组。
DiskCache类图:

在上面类图中DiskLruCacheFactory专门用来创建DiskLruCacheWrapper的,它是实现了DiskCache接口,实际上保存数据是DiskLruCache类,DiskLruCacheFactory需要CacheDirectoryGetter接口获取保存的目录,所以InternalCacheDiskCacheFactory实现类中传给DiskLruCacheFactory一个CacheDirectoryGetter的匿名内部类,将内存存储的路径传给父类。
解码过程
解码前:获取ByteBufferFetcher
保存原始图片到本地后,就是bitmap解码了,在之前的glide加载流程介绍过,回到SourceGenerator的startNext方法,调完cacheData后,就会调用DataCacheGenerator的startNext方法:
 1
 2
 3
 4
 5
 6
 7
 8
 9
10
11
12
13
14
15
16
17
18
19
20
21
22
23
24
25
26
27
28
29
30
31
32
33
34
35
36
37
38
39
40
|
//SourceGenerator的startNext方法
public boolean startNext() {
  if (dataToCache != null) {
  }
  if (sourceCacheGenerator != null && sourceCacheGenerator.startNext()) {
    return true;
  }
}
//DataCacheGenerator的startNext方法
public boolean startNext() {
  while (modelLoaders == null || !hasNextModelLoader()) {
    sourceIdIndex++;
    if (sourceIdIndex >= cacheKeys.size()) {
      return false;
    }

    Key sourceId = cacheKeys.get(sourceIdIndex);
    Key originalKey = new DataCacheKey(sourceId, helper.getSignature());
    cacheFile = helper.getDiskCache().get(originalKey);
    if (cacheFile != null) {
      this.sourceKey = sourceId;
      modelLoaders = helper.getModelLoaders(cacheFile);
      modelLoaderIndex = 0;
    }
  }

  loadData = null;
  boolean started = false;
  while (!started && hasNextModelLoader()) {
    ModelLoader<File, ?> modelLoader = modelLoaders.get(modelLoaderIndex++);
    loadData =
        modelLoader.buildLoadData(
            cacheFile, helper.getWidth(), helper.getHeight(), helper.getOptions());
    if (loadData != null && helper.hasLoadPath(loadData.fetcher.getDataClass())) {
      started = true;
      loadData.fetcher.loadData(helper.getPriority(), this);
    }
  }
  return started;
}
|
上面和前面介绍的HttpUrlFetcher获取是一样的过程,只不过此处传进去的model是File类型,能匹配到Model是File类型有如下几个:
1
2
3
4
|
append(File.class, ByteBuffer.class, new ByteBufferFileLoader.Factory())
append(File.class, InputStream.class, new FileLoader.StreamFactory())
append(File.class, ParcelFileDescriptor.class, new FileLoader.FileDescriptorFactory())
append(File.class, File.class, UnitModelLoader.Factory.<File>getInstance())
|
这几个ModelLoader的handles方法都返回true,接着调用ModelLoader的buildLoadData获取LoadData,ByteBufferFileLoader的buildLoadData:
1
2
3
4
5
6
|
public class ByteBufferFileLoader implements ModelLoader<File, ByteBuffer> {
  public LoadData<ByteBuffer> buildLoadData(
      @NonNull File file, int width, int height, @NonNull Options options) {
    return new LoadData<>(new ObjectKey(file), new ByteBufferFetcher(file));
  }
}
|
FileLoader的buildLoadData:
1
2
3
4
5
6
7
|
public class FileLoader<Data> implements ModelLoader<File, Data> {
  @Override
  public LoadData<Data> buildLoadData(
      @NonNull File model, int width, int height, @NonNull Options options) {
    return new LoadData<>(new ObjectKey(model), new FileFetcher<>(model, fileOpener));
  }
}
|
UnitModelLoader的buildLoadData:
1
2
3
4
5
6
|
public class UnitModelLoader<Model> implements ModelLoader<Model, Model> {
  public LoadData<Model> buildLoadData(
      @NonNull Model model, int width, int height, @NonNull Options options) {
    return new LoadData<>(new ObjectKey(model), new UnitFetcher<>(model));
  }
}
|
回到前面DataCacheGenerator的startNext方法,获取到LoadData后,通过DecodeHelper的hasLoadPath是否为true:
 1
 2
 3
 4
 5
 6
 7
 8
 9
10
11
12
13
14
15
16
17
18
19
20
21
22
23
24
25
|
boolean hasLoadPath(Class<?> dataClass) {
  return getLoadPath(dataClass) != null;
}
<Data> LoadPath<Data, ?, Transcode> getLoadPath(Class<Data> dataClass) {
  return glideContext.getRegistry().getLoadPath(dataClass, resourceClass, transcodeClass);
}

public <Data, TResource, Transcode> LoadPath<Data, TResource, Transcode> getLoadPath(
    @NonNull Class<Data> dataClass,
    @NonNull Class<TResource> resourceClass,
    @NonNull Class<Transcode> transcodeClass) {
  LoadPath<Data, TResource, Transcode> result =
      loadPathCache.get(dataClass, resourceClass, transcodeClass);
  List<DecodePath<Data, TResource, Transcode>> decodePaths =
      getDecodePaths(dataClass, resourceClass, transcodeClass);
  if (decodePaths.isEmpty()) {
    result = null;
  } else {
    result =
        new LoadPath<>(
            dataClass, resourceClass, transcodeClass, decodePaths, throwableListPool);
  }
  loadPathCache.put(dataClass, resourceClass, transcodeClass, result);
  return result;
}
|
通过getDecodePaths获取到已注册的DecodePath:
 1
 2
 3
 4
 5
 6
 7
 8
 9
10
11
12
13
14
15
16
17
18
19
20
21
22
23
24
25
26
27
28
29
30
31
32
33
34
35
36
37
38
39
40
41
42
43
44
45
46
47
48
49
50
|
private <Data, TResource, Transcode> List<DecodePath<Data, TResource, Transcode>> getDecodePaths(
    @NonNull Class<Data> dataClass,
    @NonNull Class<TResource> resourceClass,
    @NonNull Class<Transcode> transcodeClass) {
  List<DecodePath<Data, TResource, Transcode>> decodePaths = new ArrayList<>();
  List<Class<TResource>> registeredResourceClasses =
      decoderRegistry.getResourceClasses(dataClass, resourceClass);

  for (Class<TResource> registeredResourceClass : registeredResourceClasses) {
    List<Class<Transcode>> registeredTranscodeClasses =
        transcoderRegistry.getTranscodeClasses(registeredResourceClass, transcodeClass);

    for (Class<Transcode> registeredTranscodeClass : registeredTranscodeClasses) {

      List<ResourceDecoder<Data, TResource>> decoders =
          decoderRegistry.getDecoders(dataClass, registeredResourceClass);
      ResourceTranscoder<TResource, Transcode> transcoder =
          transcoderRegistry.get(registeredResourceClass, registeredTranscodeClass);
      @SuppressWarnings("PMD.AvoidInstantiatingObjectsInLoops")
      DecodePath<Data, TResource, Transcode> path =
          new DecodePath<>(
              dataClass,
              registeredResourceClass,
              registeredTranscodeClass,
              decoders,
              transcoder,
              throwableListPool);
      decodePaths.add(path);
    }
  }
  return decodePaths;
}

public synchronized <T, R> List<Class<R>> getResourceClasses(
    @NonNull Class<T> dataClass, @NonNull Class<R> resourceClass) {
  List<Class<R>> result = new ArrayList<>();
  for (String bucket : bucketPriorityList) {
    List<Entry<?, ?>> entries = decoders.get(bucket);
    if (entries == null) {
      continue;
    }
    for (Entry<?, ?> entry : entries) {
      if (entry.handles(dataClass, resourceClass)
          && !result.contains((Class<R>) entry.resourceClass)) {
        result.add((Class<R>) entry.resourceClass);
      }
    }
  }
  return result;
}
|
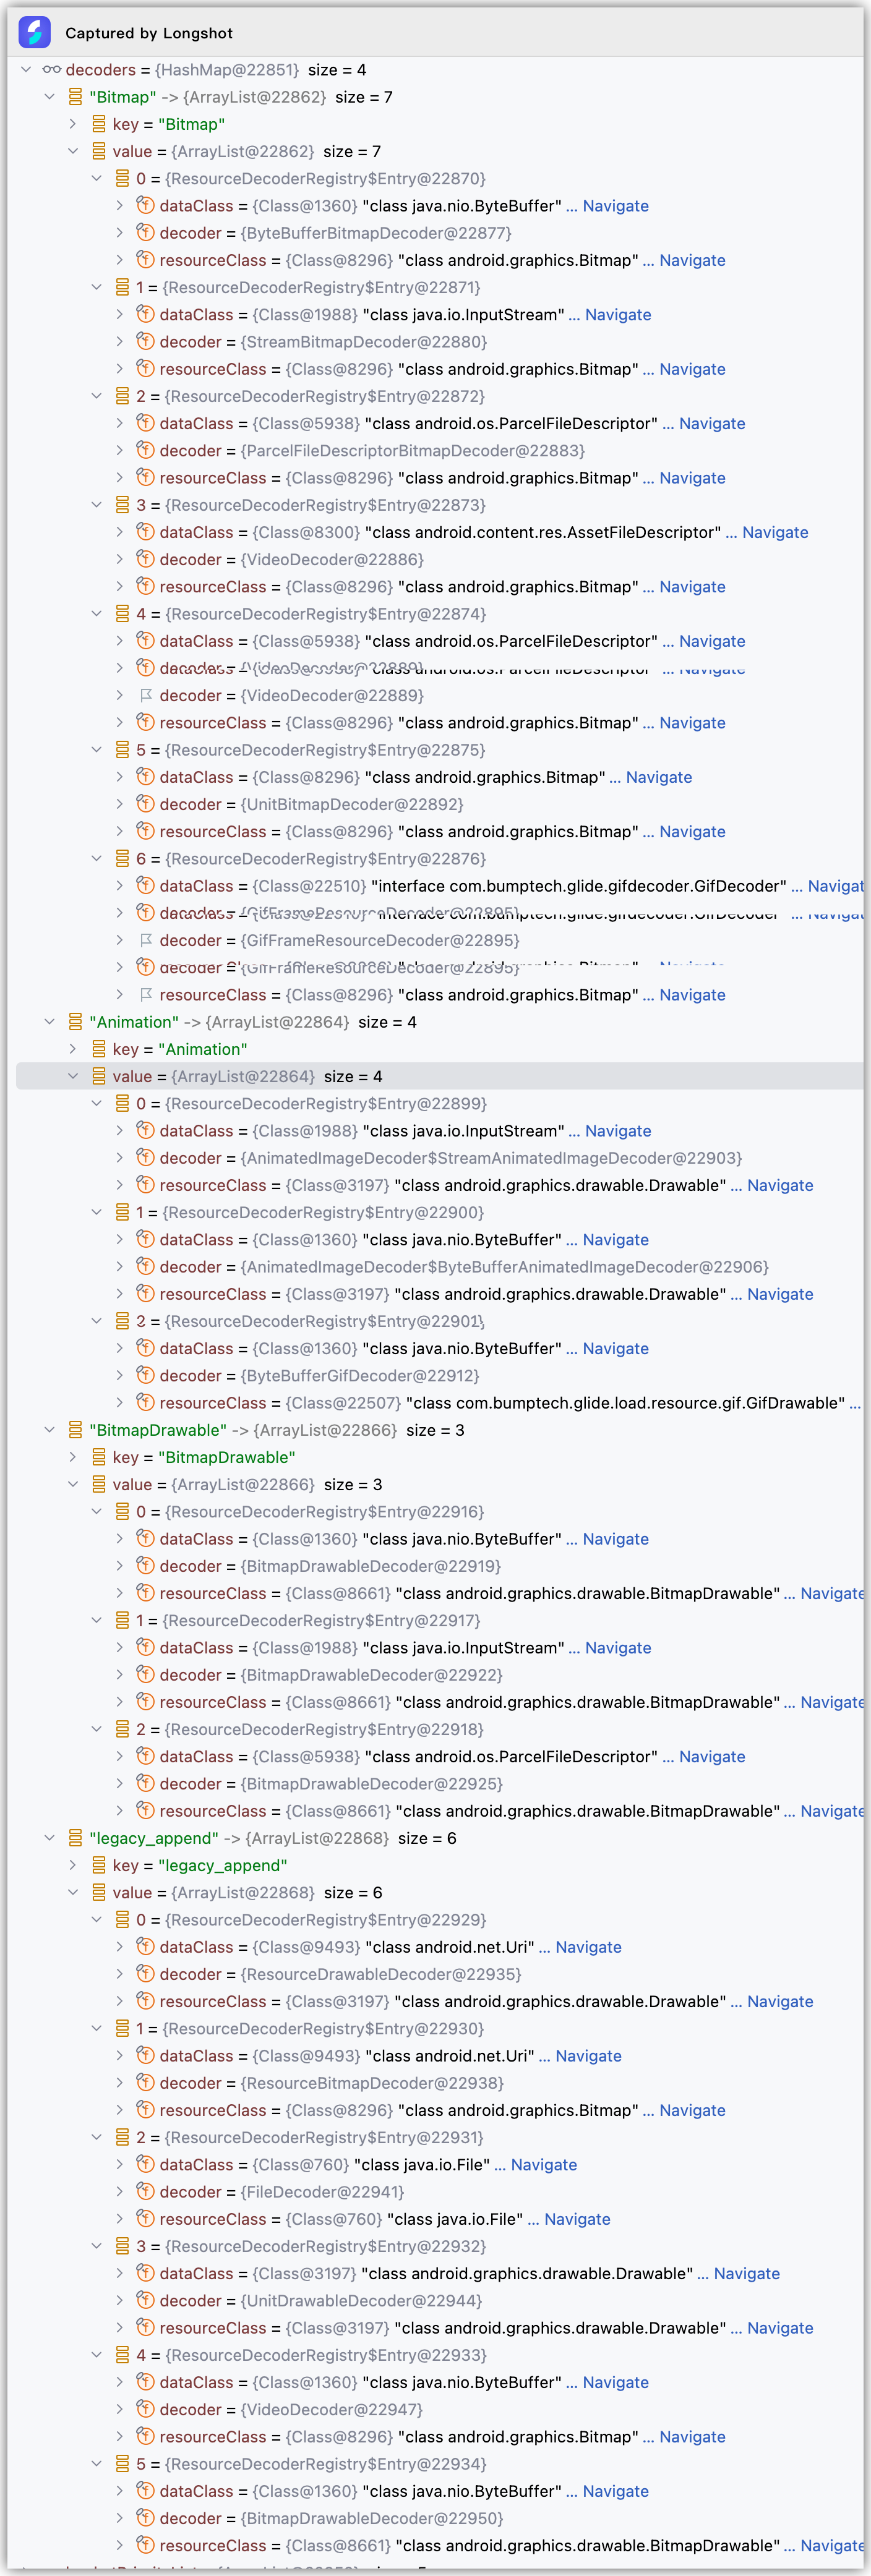
到这里后,我们需要熟悉bucketPriorityList和decoders,bucketPriorityList是分组信息,decoders是在Registry初始化注册进来的一些Entry集合表。在上面传进来的dataClass是ModelLoaders中创建的LoadData的fetcher中指定的getDataClass,resourceClass默认是Object.class:
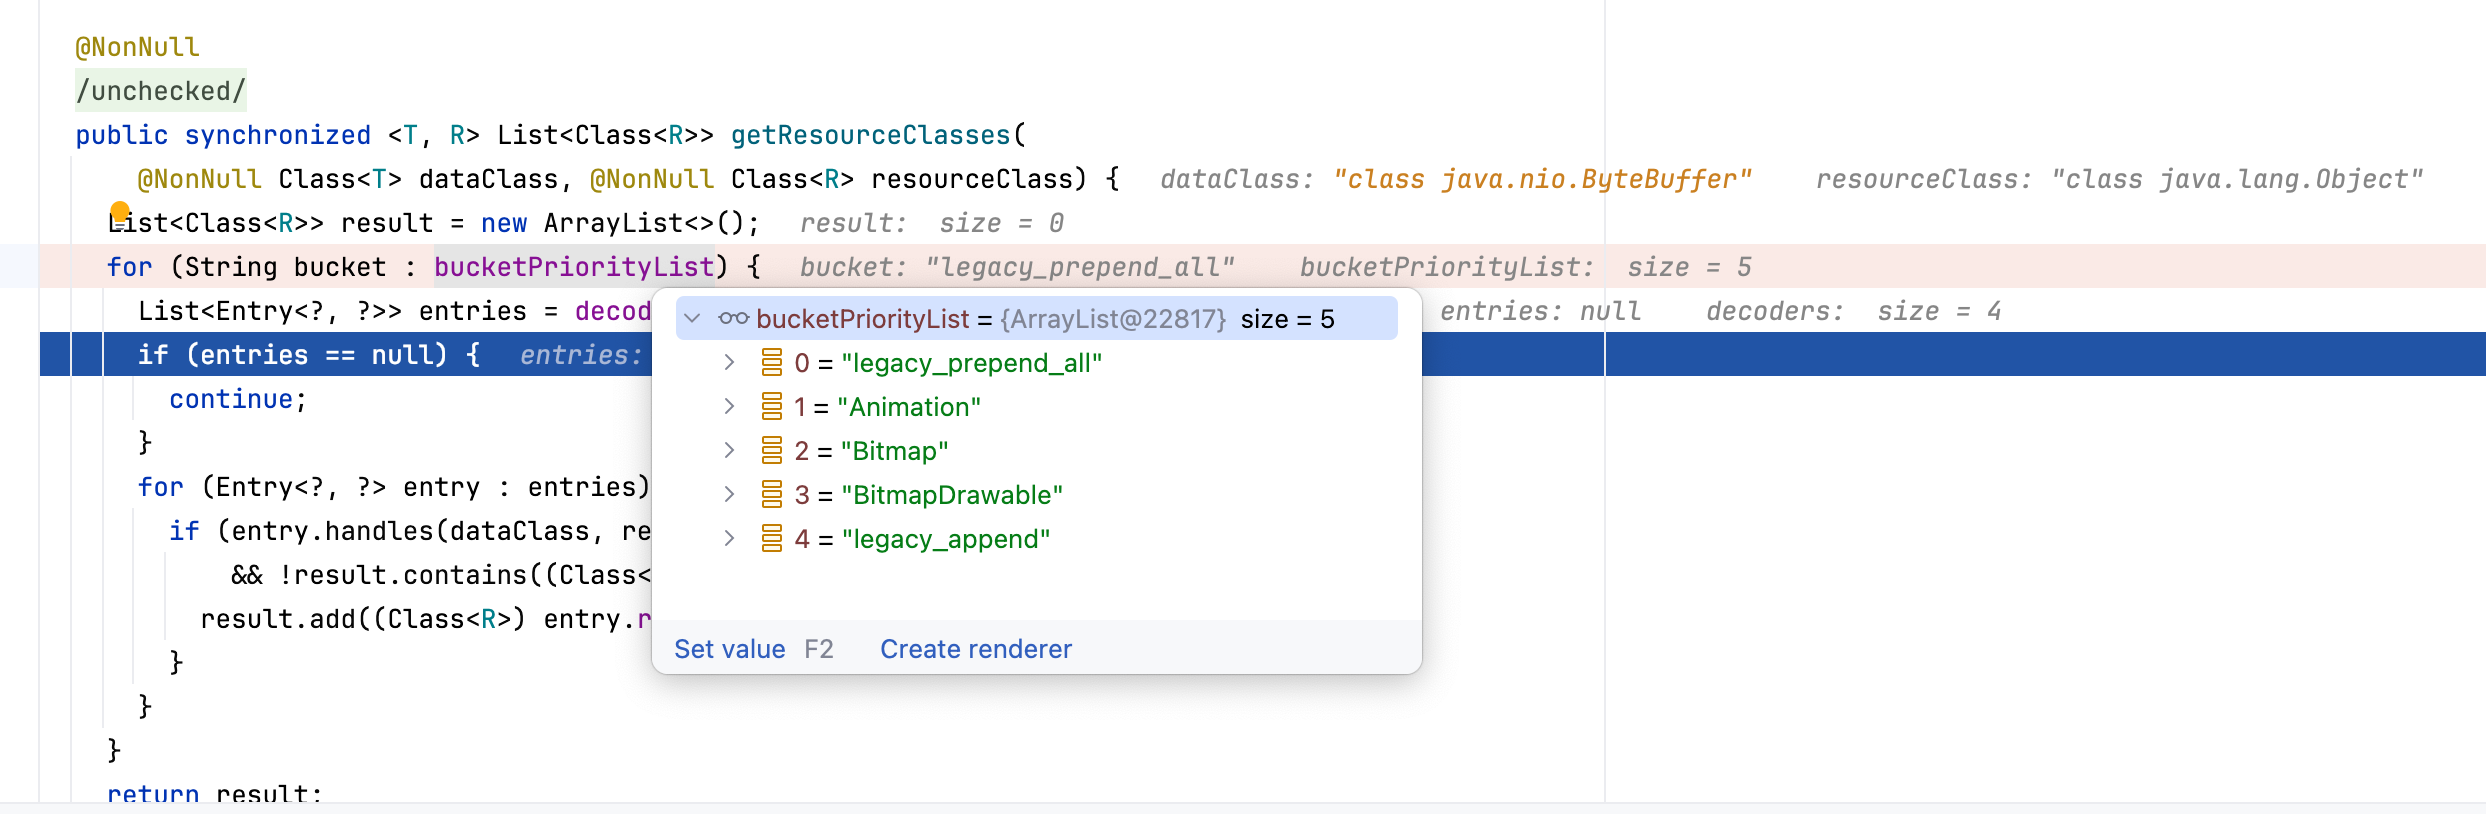
从上面debug数据可以看出来,传进来的dataClass是 java.nio.ByteBuffer ,resourceClass是 java.lang.Object ,因为在拿到第一个ByteBufferFileLoader创建的LoadData中所创建的Fetcher是ByteBufferFetcher,它的getDataClass方法如下:
1
2
3
4
5
6
|
private static final class ByteBufferFetcher implements DataFetcher<ByteBuffer> {
  @Override
  public Class<ByteBuffer> getDataClass() {
    return ByteBuffer.class;
  }
}
|
通过上面的getResourceClasses中entry的handle(dataClass, resourceClass)进行过滤出dataClass为 java.nio.ByteBuffer 的Entry来,所以会返回 android.graphics.drawable.Drawable 、 com.bumptech.glide.load.resource.gif.GifDrawable 、 android.graphics.drawable.Bitmap 、 android.graphics.drawable.BitmapDrawable 这四种resourceClass。回到上面的getDecodePaths方法,registeredResourceClasses指向这四种class,接着遍历该集合。调用transcoderRegistry.getTranscodeClasses(registeredResourceClass, transcodeClass),registeredTranscodeClasses会获取到对应resourceClass的TranscodeClasses,然后继续遍历registeredTranscodeClasses,获取每一个resourceClass的decoders,最后构建DecodePath添加到集合中返回,这里列出4种ResourceClass的DecodePath情况:
android.graphics.drawable.Drawable : DecodePath(dataClass= java.nio.ByteBuffer , registeredResourceClass= android.graphics.drawable.Drawable , registeredTranscodeClass= android.graphics.drawable.Drawable , decoders=[AnimatedImageDecoder$ByteBufferAnimatedImageDecoder、ByteBufferGifDecoder、BitmapDrawableDecoder、BitmapDrawableDecoder], transcoder=UnitTranscoder)com.bumptech.glide.load.resource.gif.GifDrawable : DecodePath(dataClass= java.nio.ByteBuffer , registeredResourceClass= com.bumptech.glide.load.resource.gif.GifDrawable , registeredTranscodeClass= com.bumptech.glide.load.resource.gif.GifDrawable,decoders=[ByteBufferGifDecoder] transcoder=UnitTranscoder)android.graphics.drawable.Bitmap : DecodePath(dataClass= java.nio.ByteBuffer , registeredResourceClass= android.graphics.drawable.Bitmap , registeredTranscodeClass=BitmapDrawable.class,decoders= [ByteBufferBitmapDecoder], transcoder=UnitTranscoder)android.graphics.drawable.BitmapDrawable : DecodePath(dataClass= java.nio.ByteBuffer , registeredResourceClass= android.graphics.drawable.BitmapDrawable , registeredTranscodeClass=android.graphics.drawable.BitmapDrawable,decoders= [BitmapDrawableDecoder、BitmapDrawableDecoder], transcoder=UnitTranscoder)
最终在Registry的getLoadPath方法中将返回的decodePaths构建成LoadPath,并添加到loadPathCache中,所以在上面DataCacheGenerator中loadData.fetcher是一个ByteBufferFetcher。
解码前:将File转化成ByteBuffer
在解码前需要将File转化成ByteBuffer,而没有直接通过File转化成Bitmap,原因有如下几点:
- Glide 解码框架是基于 “Data → ByteBuffer/InputStream → Resource” 的模型设计
- File → BitmapFactory 解码是顺序 I/O,不能 random access
- 需要 Rewind(重读)—— File 做不到,ByteBuffer 支持
- 支持 GIF、WebP 等复杂格式,必须使用 ByteBuffer
- Glide 要支持 Transformation(圆角、裁剪、缩放)等 decode 前后处理
- Glide 的缓存结构使用的是字节缓存,不是文件缓存(除磁盘缓存)
来看下ByteBufferFetcher的loadData实现:
 1
 2
 3
 4
 5
 6
 7
 8
 9
10
11
12
13
14
15
|
@Override
public void loadData(
    @NonNull Priority priority, @NonNull DataCallback<? super ByteBuffer> callback) {
  ByteBuffer result = ByteBufferUtil.fromFile(file);
  callback.onDataReady(result);
}

public static ByteBuffer fromFile(@NonNull File file) throws IOException {
  RandomAccessFile raf = null;
  FileChannel channel = null;
  long fileLength = file.length();
  raf = new RandomAccessFile(file, "r");
  channel = raf.getChannel();
  return channel.map(FileChannel.MapMode.READ_ONLY, 0, fileLength).load();
}
|
首先获取RandomAccessFile的FileChannel,让你使用 NIO(New I/O)高速文件通道,让你能对文件进行更快、更底层的操作,然后通过map方法将file内容映射到内存,从而不像普通io一样read/write那样系统调用,不需要用户态内核态拷贝,返回的MappedByteBuffer 是内存映射文件,对 ByteBuffer 的操作就是在直接修改文件内容。比如下面通过put方法给指定位置插入字符的事例:
 1
 2
 3
 4
 5
 6
 7
 8
 9
10
11
12
13
14
15
16
17
18
19
20
21
22
23
24
25
|
public static void insertByteByPosition(){
  int insertPos = 3;
  byte value = (byte) '9';
  RandomAccessFile raf = new RandomAccessFile("./test.txt", "rw");
  FileChannel channel = raf.getChannel();
  long oldLen = channel.size();
  long newLen = oldLen + 1;
  // 1. 扩展文件长度
  raf.setLength(newLen);
  // 2. 重新 map 全文件区域
  MappedByteBuffer buffer = channel.map(
          FileChannel.MapMode.READ_WRITE,
          0,
          newLen
  );
  // 3. 从后往前移动数据(避免覆盖)
  for (long i = oldLen - 1; i >= insertPos; i--) {
      byte b = buffer.get((int) i);
      buffer.put((int) (i + 1), b);
  }
  // 4. 插入新的字节
  buffer.put(insertPos, value);
  channel.close();
  raf.close();
}
|
开始解码
转化成ByteBuffer就回到了DecodeJob的decodeFromRetrievedData方法,这个在Glide加载图片流程中有讲到,在该方法里面调用了decodeFromData方法:
1
2
3
4
5
|
private <Data> Resource<R> decodeFromData(
    DataFetcher<?> fetcher, Data data, DataSource dataSource) throws GlideException {
  Resource<R> result = decodeFromFetcher(data, dataSource);
  return result;
}
|
此处的data是上面说到的ByteBuffer,dataSource是ByteBufferFetcher的getDataSource方法返回的DataSource.LOCAL。继续看decodeFromFetcher方法:
1
2
3
4
5
|
private <Data> Resource<R> decodeFromFetcher(Data data, DataSource dataSource)
    throws GlideException {
  LoadPath<Data, ?, R> path = decodeHelper.getLoadPath((Class<Data>) data.getClass());
  return runLoadPath(data, dataSource, path);
}
|
又回到了上面说的LoadPath获取部分,上面分析过loadPathCache会构建一个LoadPath,里面放了4个DataPath,loadPathCache的dataClass是 ByteBuffer.class ,resourceClass是 java.lang.Object.class ,transcodeClass是 Drawable.class ,result就是刚刚上面说的4个DataPath。接着调用runLoadPath方法:
1
2
3
4
5
6
7
8
|
private <Data, ResourceType> Resource<R> runLoadPath(
    Data data, DataSource dataSource, LoadPath<Data, ResourceType, R> path)
    throws GlideException {
  Options options = getOptionsWithHardwareConfig(dataSource);
  DataRewinder<Data> rewinder = glideContext.getRegistry().getRewinder(data);
  return path.load(
        rewinder, options, width, height, new DecodeCallback<ResourceType>(dataSource));
}
|
此处的rewinder和上面InputStreamRewinder获取类似,只不过这里的data是一个ByteBuffer.class类型,它获取到的是ByteBufferRewinder对象,然后调用LoadPath的load方法:
 1
 2
 3
 4
 5
 6
 7
 8
 9
10
11
12
13
14
15
16
17
18
19
20
21
22
23
24
25
26
27
28
29
30
31
32
33
34
35
36
37
38
39
40
41
42
43
44
45
46
47
48
49
50
51
52
53
54
55
56
57
58
59
60
61
62
63
64
65
66
67
68
69
70
71
72
|
public Resource<Transcode> load(
    DataRewinder<Data> rewinder,
    @NonNull Options options,
    int width,
    int height,
    DecodePath.DecodeCallback<ResourceType> decodeCallback)
    throws GlideException {
  return loadWithExceptionList(rewinder, options, width, height, decodeCallback, throwables);
}

//LoadPath.loadWithExceptionList
private Resource<Transcode> loadWithExceptionList(
    DataRewinder<Data> rewinder,
    @NonNull Options options,
    int width,
    int height,
    DecodePath.DecodeCallback<ResourceType> decodeCallback,
    List<Throwable> exceptions)
    throws GlideException {
  Resource<Transcode> result = null;
  for (int i = 0, size = decodePaths.size(); i < size; i++) {
    DecodePath<Data, ResourceType, Transcode> path = decodePaths.get(i);
    result = path.decode(rewinder, width, height, options, decodeCallback);
    if (result != null) {
      break;
    }
  }
  return result;
}

//DecodePath.decode
public Resource<Transcode> decode(
    DataRewinder<DataType> rewinder,
    int width,
    int height,
    @NonNull Options options,
    DecodeCallback<ResourceType> callback)
    throws GlideException {
  Resource<ResourceType> decoded = decodeResource(rewinder, width, height, options);
  Resource<ResourceType> transformed = callback.onResourceDecoded(decoded);
  return transcoder.transcode(transformed, options);
}

//DecodePath.decodeResource
private Resource<ResourceType> decodeResource(
    DataRewinder<DataType> rewinder, int width, int height, @NonNull Options options)
    throws GlideException {
  return decodeResourceWithList(rewinder, width, height, options, exceptions);
}

//DecodePath.decodeResourceWithList
private Resource<ResourceType> decodeResourceWithList(
    DataRewinder<DataType> rewinder,
    int width,
    int height,
    @NonNull Options options,
    List<Throwable> exceptions)
    throws GlideException {
  Resource<ResourceType> result = null;
  for (int i = 0, size = decoders.size(); i < size; i++) {
    ResourceDecoder<DataType, ResourceType> decoder = decoders.get(i);
    DataType data = rewinder.rewindAndGet();
    if (decoder.handles(data, options)) {
      data = rewinder.rewindAndGet();
      result = decoder.decode(data, width, height, options);
    }
    if (result != null) {
      break;
    }
  }
  return result;
}
|
最终通过DecodePath的decode方法进行解码Bitmap,上面说过LoadPath中存在4种DecodePath,最终调用到DecodePath的decodeResourceWithList,该方法里面会调用前面会遍历DecodePath中的decoders集合,然后调用ResourceDecoder的decode方法,那么直接看前面分析过有哪些decoder,比如第一个decoder是AnimatedImageDecoder$ByteBufferAnimatedImageDecoder,首先来看下它的handles方法:
1
2
3
4
5
|
private final AnimatedImageDecoder delegate;
public boolean handles(@NonNull ByteBuffer source, @NonNull Options options)
    throws IOException {
  return delegate.handles(source);
}
|
此处的delegate是AnimatedImageDecoder,看下它的handles方法:
1
2
3
|
boolean handles(ByteBuffer byteBuffer) throws IOException {
  return isHandled(ImageHeaderParserUtils.getType(imageHeaderParsers, byteBuffer));
}
|
ImageHeaderParserUtils的getType方法是获取图片是PNG、WEBP等格式的方法,它是通过ByteBuffer相应位置的字节进行判断,imageHeaderParsers是DefaultImageHeaderParser和ExifInterfaceImageHeaderParser的集合,关于这部分就不用展开说了,后面会单独说如何获取图片的格式。再来看下isHandled方法:
1
2
3
4
|
private boolean isHandled(ImageType imageType) {
  return imageType == ImageType.ANIMATED_WEBP
      || (Build.VERSION.SDK_INT >= Build.VERSION_CODES.S && imageType == ImageType.ANIMATED_AVIF);
}
|
如果图片是带动画的webp或者是ANIMATED_AVIF格式才会使用该decoder进行解码。最终在BUCKET=“BitmapDrawable”,dataClass=ByteBuffer.class,resourceClass=BitmapDrawable.class, decoder=BitmapDrawableDecoder的DecodePath下才会校验通过,BitmapDrawableDecoder的handles和decode如下:
 1
 2
 3
 4
 5
 6
 7
 8
 9
10
11
12
13
14
|
class BitmapDrawableDecoder{
  private final ResourceDecoder<DataType, Bitmap> decoder;
  @Override
  public boolean handles(@NonNull DataType source, @NonNull Options options) throws IOException {
    return decoder.handles(source, options);
  }
  @Override
  public Resource<BitmapDrawable> decode(
      @NonNull DataType source, int width, int height, @NonNull Options options)
      throws IOException {
    Resource<Bitmap> bitmapResource = decoder.decode(source, width, height, options);
    return LazyBitmapDrawableResource.obtain(resources, bitmapResource);
  }
}
|
此处的decoder实际一个ByteBufferBitmapDecoder:
 1
 2
 3
 4
 5
 6
 7
 8
 9
10
11
12
13
14
15
16
17
18
19
20
|
/** Decodes {@link android.graphics.Bitmap Bitmaps} from {@link java.nio.ByteBuffer ByteBuffers}. */
public class ByteBufferBitmapDecoder implements ResourceDecoder<ByteBuffer, Bitmap> {
  private final Downsampler downsampler;

  public ByteBufferBitmapDecoder(Downsampler downsampler) {
    this.downsampler = downsampler;
  }

  @Override
  public boolean handles(@NonNull ByteBuffer source, @NonNull Options options) {
    return downsampler.handles(source);
  }

  @Override
  public Resource<Bitmap> decode(
      @NonNull ByteBuffer source, int width, int height, @NonNull Options options)
      throws IOException {
    return downsampler.decode(source, width, height, options);
  }
}
|
类的注释也写得很清楚,Bitmap from ByteBuffers。
我们来看下Downsampler的handles和decode方法:
 1
 2
 3
 4
 5
 6
 7
 8
 9
10
11
12
13
14
15
|
public boolean handles(@SuppressWarnings("unused") ByteBuffer byteBuffer) {
  // We expect downsampler to handle any available type Android supports.
  return true;
}

public Resource<Bitmap> decode(
    ByteBuffer buffer, int requestedWidth, int requestedHeight, Options options)
    throws IOException {
  return decode(
      new ImageReader.ByteBufferReader(buffer, parsers, byteArrayPool),
      requestedWidth,
      requestedHeight,
      options,
      EMPTY_CALLBACKS);
}
|
接着调用另外一个decode方法,注意此时创建的ImageReader是ByteBufferReader对象:
 1
 2
 3
 4
 5
 6
 7
 8
 9
10
11
12
13
14
15
16
17
18
19
20
21
22
23
24
25
26
27
28
29
30
31
32
33
34
35
36
37
38
39
40
|
private Resource<Bitmap> decode(
    ImageReader imageReader,
    int requestedWidth,
    int requestedHeight,
    Options options,
    DecodeCallbacks callbacks)
    throws IOException {
  //从字节池子里面获取默认大小的字节数组
  byte[] bytesForOptions = byteArrayPool.get(ArrayPool.STANDARD_BUFFER_SIZE_BYTES, byte[].class);
  //从池子里面获取Options
  BitmapFactory.Options bitmapFactoryOptions = getDefaultOptions();
  //设置一个临时可选的缓冲区(byte[]),用于解码 Bitmap 时作为 中间读写缓冲
  bitmapFactoryOptions.inTempStorage = bytesForOptions;

  DecodeFormat decodeFormat = options.get(DECODE_FORMAT);
  PreferredColorSpace preferredColorSpace = options.get(PREFERRED_COLOR_SPACE);
  DownsampleStrategy downsampleStrategy = options.get(DownsampleStrategy.OPTION);
  boolean fixBitmapToRequestedDimensions = options.get(FIX_BITMAP_SIZE_TO_REQUESTED_DIMENSIONS);
  boolean isHardwareConfigAllowed =
      options.get(ALLOW_HARDWARE_CONFIG) != null && options.get(ALLOW_HARDWARE_CONFIG);

  try {
    Bitmap result =
        decodeFromWrappedStreams(
            imageReader,
            bitmapFactoryOptions,
            downsampleStrategy,
            decodeFormat,
            preferredColorSpace,
            isHardwareConfigAllowed,
            requestedWidth,
            requestedHeight,
            fixBitmapToRequestedDimensions,
            callbacks);
    return BitmapResource.obtain(result, bitmapPool);
  } finally {
    releaseOptions(bitmapFactoryOptions);
    byteArrayPool.put(bytesForOptions);
  }
}
|
首先从池子中创建一个64KB的字节数组,然后从池子中获取一个默认的Options,接着将前面获取到的byte数组给到Options的inTempStorage,它的作用是给一个临时的缓冲区,用于解码bitmap时作为中间读写缓冲,如果不设置,系统每次解码时会自己new一个临时byte[]来用,该缓冲区主要在以下场景会用到:
- 读取图片头(Header)
- 比如检测是否 PNG/JPEG/WebP、宽高、是否有 alpha 等。
- 读取压缩数据块(如 JPEG 的 MCUs)
- JPEG 解码时会分段读取压缩内容,需要一个临时缓冲。
- 从流中读取数据时作为 I/O buffer
- 例如 InputStream → Skia 的内部解码器需要 buffer 装载部分数据。
接着调用了decodeFromWrappedStreams方法:
  1
  2
  3
  4
  5
  6
  7
  8
  9
 10
 11
 12
 13
 14
 15
 16
 17
 18
 19
 20
 21
 22
 23
 24
 25
 26
 27
 28
 29
 30
 31
 32
 33
 34
 35
 36
 37
 38
 39
 40
 41
 42
 43
 44
 45
 46
 47
 48
 49
 50
 51
 52
 53
 54
 55
 56
 57
 58
 59
 60
 61
 62
 63
 64
 65
 66
 67
 68
 69
 70
 71
 72
 73
 74
 75
 76
 77
 78
 79
 80
 81
 82
 83
 84
 85
 86
 87
 88
 89
 90
 91
 92
 93
 94
 95
 96
 97
 98
 99
100
101
102
103
104
105
106
|
private Bitmap decodeFromWrappedStreams(
    ImageReader imageReader,
    BitmapFactory.Options options,
    DownsampleStrategy downsampleStrategy,
    DecodeFormat decodeFormat,
    PreferredColorSpace preferredColorSpace,
    boolean isHardwareConfigAllowed,
    int requestedWidth,
    int requestedHeight,
    boolean fixBitmapToRequestedDimensions,
    DecodeCallbacks callbacks)
    throws IOException {
  long startTime = LogTime.getLogTime();
  int[] sourceDimensions = getDimensions(imageReader, options, callbacks, bitmapPool);
  int sourceWidth = sourceDimensions[0];
  int sourceHeight = sourceDimensions[1];
  String sourceMimeType = options.outMimeType;

  int orientation = imageReader.getImageOrientation();
  int degreesToRotate = TransformationUtils.getExifOrientationDegrees(orientation);
  boolean isExifOrientationRequired = TransformationUtils.isExifOrientationRequired(orientation);

  int targetWidth =
      requestedWidth == Target.SIZE_ORIGINAL
          ? (isRotationRequired(degreesToRotate) ? sourceHeight : sourceWidth)
          : requestedWidth;
  int targetHeight =
      requestedHeight == Target.SIZE_ORIGINAL
          ? (isRotationRequired(degreesToRotate) ? sourceWidth : sourceHeight)
          : requestedHeight;

  ImageType imageType = imageReader.getImageType();

  calculateScaling(
      imageType,
      imageReader,
      callbacks,
      bitmapPool,
      downsampleStrategy,
      degreesToRotate,
      sourceWidth,
      sourceHeight,
      targetWidth,
      targetHeight,
      options);
  calculateConfig(
      imageReader,
      decodeFormat,
      isHardwareConfigAllowed,
      isExifOrientationRequired,
      options,
      targetWidth,
      targetHeight);

  boolean isKitKatOrGreater = Build.VERSION.SDK_INT >= Build.VERSION_CODES.KITKAT;
  if ((options.inSampleSize == 1 || isKitKatOrGreater) && shouldUsePool(imageType)) {
    int expectedWidth;
    int expectedHeight;
    if (sourceWidth >= 0
        && sourceHeight >= 0
        && fixBitmapToRequestedDimensions
        && isKitKatOrGreater) {
      expectedWidth = targetWidth;
      expectedHeight = targetHeight;
    } else {
      float densityMultiplier =
          isScaling(options) ? (float) options.inTargetDensity / options.inDensity : 1f;
      int sampleSize = options.inSampleSize;
      int downsampledWidth = (int) Math.ceil(sourceWidth / (float) sampleSize);
      int downsampledHeight = (int) Math.ceil(sourceHeight / (float) sampleSize);
      expectedWidth = Math.round(downsampledWidth * densityMultiplier);
      expectedHeight = Math.round(downsampledHeight * densityMultiplier);
    }
    if (expectedWidth > 0 && expectedHeight > 0) {
      setInBitmap(options, bitmapPool, expectedWidth, expectedHeight);
    }
  }

  if (preferredColorSpace != null) {
    if (Build.VERSION.SDK_INT >= Build.VERSION_CODES.P) {
      boolean isP3Eligible =
          preferredColorSpace == PreferredColorSpace.DISPLAY_P3
              && options.outColorSpace != null
              && options.outColorSpace.isWideGamut();
      options.inPreferredColorSpace =
          ColorSpace.get(isP3Eligible ? ColorSpace.Named.DISPLAY_P3 : ColorSpace.Named.SRGB);
    } else if (Build.VERSION.SDK_INT >= Build.VERSION_CODES.O) {
      options.inPreferredColorSpace = ColorSpace.get(ColorSpace.Named.SRGB);
    }
  }

  Bitmap downsampled = decodeStream(imageReader, options, callbacks, bitmapPool);
  callbacks.onDecodeComplete(bitmapPool, downsampled);

  Bitmap rotated = null;
  if (downsampled != null) {
    downsampled.setDensity(displayMetrics.densityDpi);

    rotated = TransformationUtils.rotateImageExif(bitmapPool, downsampled, orientation);
    if (!downsampled.equals(rotated)) {
      bitmapPool.put(downsampled);
    }
  }

  return rotated;
}
|
首先通过getDimensions方法获取图片的原始宽高:
 1
 2
 3
 4
 5
 6
 7
 8
 9
10
11
|
private static int[] getDimensions(
    ImageReader imageReader,
    BitmapFactory.Options options,
    DecodeCallbacks decodeCallbacks,
    BitmapPool bitmapPool)
    throws IOException {
  options.inJustDecodeBounds = true;
  decodeStream(imageReader, options, decodeCallbacks, bitmapPool);
  options.inJustDecodeBounds = false;
  return new int[] {options.outWidth, options.outHeight};
}
|
在读取宽高前给Options的inJustDecodeBounds设置为true,获取完后,然后设置为false,这里是只读取图片的宽高,不进行解码加载到内存中。接着调用了decodeStream方法:
1
2
3
4
5
6
7
8
9
|
private static Bitmap decodeStream(
    ImageReader imageReader,
    BitmapFactory.Options options,
    DecodeCallbacks callbacks,
    BitmapPool bitmapPool)
    throws IOException {
  result = imageReader.decodeBitmap(options);
  return result;
}
|
此处调用了ByteBufferReader的decodeBitmap:
 1
 2
 3
 4
 5
 6
 7
 8
 9
10
11
|
public Bitmap decodeBitmap(Options options) {
  return BitmapFactory.decodeStream(stream(), /* outPadding= */ null, options);
}

private InputStream stream() {
  return ByteBufferUtil.toStream(ByteBufferUtil.rewind(buffer));
}

public static InputStream toStream(@NonNull ByteBuffer buffer) {
  return new ByteBufferStream(buffer);
}
|
此处将ByteBuffer包装成ByteBufferStream的流,Glide自定义了一个bytebuffer的输入流。有兴趣的可以看看实现,这里就不展开了,获取到图片的原始宽高后,判断图片有没有进行旋转,如果有的话,则重新计算目标宽高,否则还是之前的目标宽高,接着调用calculateScaling方法来设置采样和缩放信息:
 1
 2
 3
 4
 5
 6
 7
 8
 9
10
11
12
13
14
15
16
17
18
19
20
21
22
23
24
25
26
27
28
29
30
31
32
33
34
35
36
37
38
39
40
41
42
43
44
45
46
47
48
49
50
51
52
53
54
55
56
57
58
59
60
61
62
63
64
65
66
67
68
69
70
71
72
73
74
75
76
77
78
79
80
81
82
83
84
85
86
87
88
89
90
91
92
93
94
95
|
private static void calculateScaling(
    ImageType imageType,
    ImageReader imageReader,
    DecodeCallbacks decodeCallbacks,
    BitmapPool bitmapPool,
    DownsampleStrategy downsampleStrategy,
    int degreesToRotate,
    int sourceWidth,
    int sourceHeight,
    int targetWidth,
    int targetHeight,
    BitmapFactory.Options options)
    throws IOException {
  int orientedSourceWidth = sourceWidth;
  int orientedSourceHeight = sourceHeight;

  final float exactScaleFactor =
      downsampleStrategy.getScaleFactor(
          orientedSourceWidth, orientedSourceHeight, targetWidth, targetHeight);

  SampleSizeRounding rounding =
      downsampleStrategy.getSampleSizeRounding(
          orientedSourceWidth, orientedSourceHeight, targetWidth, targetHeight);

  int outWidth = round(exactScaleFactor * orientedSourceWidth);
  int outHeight = round(exactScaleFactor * orientedSourceHeight);

  int widthScaleFactor = orientedSourceWidth / outWidth;
  int heightScaleFactor = orientedSourceHeight / outHeight;

  int scaleFactor =
      rounding == SampleSizeRounding.MEMORY
          ? Math.max(widthScaleFactor, heightScaleFactor)
          : Math.min(widthScaleFactor, heightScaleFactor);

  int powerOfTwoSampleSize;
  // BitmapFactory does not support downsampling wbmp files on platforms <= M. See b/27305903.
  if (Build.VERSION.SDK_INT <= 23
      && NO_DOWNSAMPLE_PRE_N_MIME_TYPES.contains(options.outMimeType)) {
    powerOfTwoSampleSize = 1;
  } else {
    powerOfTwoSampleSize = Math.max(1, Integer.highestOneBit(scaleFactor));
    if (rounding == SampleSizeRounding.MEMORY
        && powerOfTwoSampleSize < (1.f / exactScaleFactor)) {
      powerOfTwoSampleSize = powerOfTwoSampleSize << 1;
    }
  }

  options.inSampleSize = powerOfTwoSampleSize;
  int powerOfTwoWidth;
  int powerOfTwoHeight;
  if (imageType == ImageType.JPEG) {
    int nativeScaling = Math.min(powerOfTwoSampleSize, 8);
    powerOfTwoWidth = (int) Math.ceil(orientedSourceWidth / (float) nativeScaling);
    powerOfTwoHeight = (int) Math.ceil(orientedSourceHeight / (float) nativeScaling);
    int secondaryScaling = powerOfTwoSampleSize / 8;
    if (secondaryScaling > 0) {
      powerOfTwoWidth = powerOfTwoWidth / secondaryScaling;
      powerOfTwoHeight = powerOfTwoHeight / secondaryScaling;
    }
  } else if (imageType == ImageType.PNG || imageType == ImageType.PNG_A) {
    powerOfTwoWidth = (int) Math.floor(orientedSourceWidth / (float) powerOfTwoSampleSize);
    powerOfTwoHeight = (int) Math.floor(orientedSourceHeight / (float) powerOfTwoSampleSize);
  } else if (imageType.isWebp()) {
    if (Build.VERSION.SDK_INT >= Build.VERSION_CODES.N) {
      powerOfTwoWidth = Math.round(orientedSourceWidth / (float) powerOfTwoSampleSize);
      powerOfTwoHeight = Math.round(orientedSourceHeight / (float) powerOfTwoSampleSize);
    } else {
      powerOfTwoWidth = (int) Math.floor(orientedSourceWidth / (float) powerOfTwoSampleSize);
      powerOfTwoHeight = (int) Math.floor(orientedSourceHeight / (float) powerOfTwoSampleSize);
    }
  } else if (orientedSourceWidth % powerOfTwoSampleSize != 0
      || orientedSourceHeight % powerOfTwoSampleSize != 0) {
    int[] dimensions = getDimensions(imageReader, options, decodeCallbacks, bitmapPool);
    powerOfTwoWidth = dimensions[0];
    powerOfTwoHeight = dimensions[1];
  } else {
    powerOfTwoWidth = orientedSourceWidth / powerOfTwoSampleSize;
    powerOfTwoHeight = orientedSourceHeight / powerOfTwoSampleSize;
  }

  double adjustedScaleFactor =
      downsampleStrategy.getScaleFactor(
          powerOfTwoWidth, powerOfTwoHeight, targetWidth, targetHeight);

  if (Build.VERSION.SDK_INT >= Build.VERSION_CODES.KITKAT) {
    options.inTargetDensity = adjustTargetDensityForError(adjustedScaleFactor);
    options.inDensity = getDensityMultiplier(adjustedScaleFactor);
  }
  if (isScaling(options)) {
    options.inScaled = true;
  } else {
    options.inDensity = options.inTargetDensity = 0;
  }
}
|
首先通过downsampleStrategy.getScaleFactor获取缩放比,默认FitCenter:
1
2
3
4
5
6
7
8
|
private static class FitCenter extends DownsampleStrategy {
@Override
public float getScaleFactor(
    int sourceWidth, int sourceHeight, int requestedWidth, int requestedHeight) {
  float widthPercentage = requestedWidth / (float) sourceWidth;
  float heightPercentage = requestedHeight / (float) sourceHeight;
  return Math.min(widthPercentage, heightPercentage);
}
|
需要宽高比上原始宽高的比取小的比例,比如在前面分析过一张544*184图片,imageView的宽高设置的wrap_content,获取到的requestedWidth和requestedHeight在小米10上是2206,所以getScaleFactor获取到的宽比例要小,差不多是4的样子。所以第一次算出来的exactScaleFactor是4,继续调用downsampleStrategy.getSampleSizeRounding是保质量还是保内存。在小米10上是保质量。然后算出outWidth和outWidth,它们是表示缩放后的大小,通过 sourceWidth*exactScaleFactor 算出来的,高也是如此。然后算出宽高各自的缩放比,只不过这里缩放比是取整,然后存储到widthScaleFactor和heightScaleFactor中,然后判断是保质量还是内存,如果是保内存,则取widthScaleFactor和heightScaleFactor中的大值,如果是保质量,则取它两的小值。将结果给到scaleFactor变量,最后计算采样率:
1
2
|
int powerOfTwoSampleSize = Math.max(1, Integer.highestOneBit(scaleFactor));
options.inSampleSize = powerOfTwoSampleSize;
|
Integer.highestOneBit是对某一个整数取2的n次幂,比如5的话,它的二进制是101,那么取最高位的1,其余位都是0,所以是4,最后将该数给到options的inSampleSize设置采样率。因为采样率取值是2的n次幂。那剩下的缩放该怎么办呢?交给了density来进行精度缩放,下面来看下下半部分的缩放:
- JPEG
- 先交给libjpeg-turbo进行原生缩放,缩放最大是8,并且使用了ceil向上取整,继续判断如果目标缩放大于8的话,则剩余的缩放交给skia进行缩放
- PNG
- png类就比较简单了,直接获取任意采样后的大小,然后交给了skia进行缩放,此时是向下取整
- WebP
- 和上面的png类似,也是获取任意采样后的大小,不过分版本是四舍五入还是向下取整
- 原始宽/采样不能整除或者原始高/采样不能整除
- 继续decode一次获取采样后的宽高,剩余交给skia进行缩放
接着再一次获取采样后的比例,获取到比例后,设置options的inTargetDensity和inDensity进行精确缩放,在底层做skia缩放的时候,会通过inTargetDensity/inDensity得到一个缩放比,但是这两个数都是一个整数,那么怎么保证两个整数相除得到的比例是最终的adjustedScaleFactor(float类型),下面看下Glide是如何算inTargetDensity和inDensity:
 1
 2
 3
 4
 5
 6
 7
 8
 9
10
11
12
13
14
15
16
|
options.inTargetDensity = adjustTargetDensityForError(adjustedScaleFactor);//计算最小误差的targetDensity
options.inDensity = getDensityMultiplier(adjustedScaleFactor);//inDensity使用一个很大的分母

private static int adjustTargetDensityForError(double adjustedScaleFactor) {
  int densityMultiplier = getDensityMultiplier(adjustedScaleFactor);
  int targetDensity = round(densityMultiplier * adjustedScaleFactor);
  float scaleFactorWithError = targetDensity / (float) densityMultiplier;
  double difference = adjustedScaleFactor / scaleFactorWithError;
  return round(difference * targetDensity);
}
private static int getDensityMultiplier(double adjustedScaleFactor) {
  return (int)
      Math.round(
          Integer.MAX_VALUE
              * (adjustedScaleFactor <= 1D ? adjustedScaleFactor : 1 / adjustedScaleFactor));
}
|
getDensityMultiplier方法是得到一个目标比例的分母,可以看出来它是一个很大的数,那自然而然,targetDensity(第一次的实际density)就是densityMultiplier(分母)*adjustedScaleFactor(目标比例)。然后得到实例比例(scaleFactorWithError),再看预期比例(adjustedScaleFactor)和实际比例(scaleFactorWithError)相隔多少倍,然后把这个差的倍数补上到第一次算的实际density(targetDensity)就得到最小误差的density,上面就是整个缩放的逻辑了。
再回到上面decode中的calculateConfig,它主要是通过判断是否有alpha通道来得到一个合适的解码方式:
 1
 2
 3
 4
 5
 6
 7
 8
 9
10
11
12
13
14
15
16
17
18
19
20
21
22
23
|
private void calculateConfig(
    ImageReader imageReader,
    DecodeFormat format,
    boolean isHardwareConfigAllowed,
    boolean isExifOrientationRequired,
    BitmapFactory.Options optionsWithScaling,
    int targetWidth,
    int targetHeight) {

  if (format == DecodeFormat.PREFER_ARGB_8888
      || Build.VERSION.SDK_INT == Build.VERSION_CODES.JELLY_BEAN) {
    optionsWithScaling.inPreferredConfig = Bitmap.Config.ARGB_8888;
    return;
  }

  boolean hasAlpha = imageReader.getImageType().hasAlpha();

  optionsWithScaling.inPreferredConfig =
      hasAlpha ? Bitmap.Config.ARGB_8888 : Bitmap.Config.RGB_565;
  if (optionsWithScaling.inPreferredConfig == Config.RGB_565) {
    optionsWithScaling.inDither = true;
  }
}
|
在Glide中format默认是 DecodeFormat.PREFER_ARGB_8888 ,如果要设置的话,通过注解可以配置,所以Glide优先是使用 Bitmap.Config.ARGB_8888 , 如果默认不是 DecodeFormat.PREFER_ARGB_8888 ,判断图片是否带透明信息,如果带的话,也是设置成 Bitmap.Config.ARGB_8888 ,否则是 Bitmap.Config.RGB_565 。scale和config处理完事后,最后就是options的inBitmap处理了:
 1
 2
 3
 4
 5
 6
 7
 8
 9
10
11
12
13
14
15
16
17
18
19
20
21
22
23
24
25
26
27
|
float densityMultiplier =
    isScaling(options) ? (float) options.inTargetDensity / options.inDensity : 1f;
int sampleSize = options.inSampleSize;
int downsampledWidth = (int) Math.ceil(sourceWidth / (float) sampleSize);
int downsampledHeight = (int) Math.ceil(sourceHeight / (float) sampleSize);
expectedWidth = Math.round(downsampledWidth * densityMultiplier);
expectedHeight = Math.round(downsampledHeight * densityMultiplier);
if (expectedWidth > 0 && expectedHeight > 0) {
  setInBitmap(options, bitmapPool, expectedWidth, expectedHeight);
}

private static void setInBitmap(
    BitmapFactory.Options options, BitmapPool bitmapPool, int width, int height) {
  @Nullable Bitmap.Config expectedConfig = null;
  if (Build.VERSION.SDK_INT >= Build.VERSION_CODES.O) {
    if (options.inPreferredConfig == Config.HARDWARE) {
      return;
    }
    expectedConfig = options.outConfig;
  }

  if (expectedConfig == null) {
    expectedConfig = options.inPreferredConfig;
  }
  // BitmapFactory will clear out the Bitmap before writing to it, so getDirty is safe.
  options.inBitmap = bitmapPool.getDirty(width, height, expectedConfig);
}
|
计算最终的宽高,然后调用setInBitmap方法,在该方法里面通过bitmapPool中找到合适的bitmap,这样在解码的时候,可以用该bitmap的内存进行解码,不需要重复创建新内存,从而减少内存抖动。所有都完事后,最后就是再一次调用decodeStream将流转化成bitmap,然后回调给上层,整个解码完成。
编码过程
编码和解码是一个对立的关系,在主流程中讲过解码完成后,先后会回调到DecodeJob的onResourceDecoded和notifyEncodeAndRelease方法:
 1
 2
 3
 4
 5
 6
 7
 8
 9
10
11
12
13
14
15
16
17
18
19
20
21
22
23
24
25
26
27
28
29
30
31
32
33
34
35
36
|
<Z> Resource<Z> onResourceDecoded(DataSource dataSource, @NonNull Resource<Z> decoded) {
  boolean isFromAlternateCacheKey = !decodeHelper.isSourceKey(currentSourceKey);
  if (diskCacheStrategy.isResourceCacheable(
      isFromAlternateCacheKey, dataSource, encodeStrategy)) {
    final Key key;
    switch (encodeStrategy) {
      case SOURCE:
        key = new DataCacheKey(currentSourceKey, signature);
        break;
      case TRANSFORMED:
        key =
            new ResourceCacheKey(
                decodeHelper.getArrayPool(),
                currentSourceKey,
                signature,
                width,
                height,
                appliedTransformation,
                resourceSubClass,
                options);
        break;
    }

    LockedResource<Z> lockedResult = LockedResource.obtain(transformed);
    deferredEncodeManager.init(key, encoder, lockedResult);
    result = lockedResult;
  }
}

private void notifyEncodeAndRelease(
    Resource<R> resource, DataSource dataSource, boolean isLoadedFromAlternateCacheKey) {
  if (deferredEncodeManager.hasResourceToEncode()) {
    deferredEncodeManager.encode(diskCacheProvider, options);
  }
  onEncodeComplete();
}
|
在onResourceDecoded回调中首先通过DiskCacheStrategy的isResourceCacheable判断解码后是否可以编码,主要是看对应的DiskCacheStrategy是否可以编码,默认是DiskCacheStrategy. AUTOMATIC,它的isResourceCacheable方法如下:
1
2
3
4
5
6
7
|
@Override
public boolean isResourceCacheable(
    boolean isFromAlternateCacheKey, DataSource dataSource, EncodeStrategy encodeStrategy) {
  return ((isFromAlternateCacheKey && dataSource == DataSource.DATA_DISK_CACHE)
          || dataSource == DataSource.LOCAL)
      && encodeStrategy == EncodeStrategy.TRANSFORMED;
}
|
isFromAlternateCacheKey表示是否能从LoadData中找到对应的sourceKey,如果从网络或从磁盘中找到原图的话,则currentSourceKey是一个GlideUrl的key,它是能从LoadData找得到的,所以isFromAlternateCacheKey为false,如果从网络返回的图片dataSource是REMOTE,如果是从磁盘中找到原图dataSource是DATA_DISK_CACHE,所以deferredEncodeManager的init方法不会调用,也就不会导致notifyEncodeAndRelease中调用deferredEncodeManager的encode,也就不会进行编码,如果我们将RequestOptions中的diskCacheStrategy换成DiskCacheStrategy. ALL就能实现编码,那我们看下DeferredEncodeManager的encode方法:
1
2
3
4
5
|
void encode(DiskCacheProvider diskCacheProvider, Options options) {
  diskCacheProvider
      .getDiskCache()
      .put(key, new DataCacheWriter<>(encoder, toEncode, options));
}
|
diskCacheProvider在上面解码的时候提过它是一个LazyDiskCacheProvider,在Engine中初始化的。在它里面是通过 DiskCache.Factory 的build方法创建DiskCache,在GlideBuilder的build方法中初始化的是InternalCacheDiskCacheFactory的 DiskCache.Factory ,最终创建的DiskLruCacheWrapper,从名字看它是一个包装类,实际干活的是DiskLruCache,它是glide内部实现的LRU算法的磁盘缓存类。这个跟上面的解码之前将InputStream保存到本地磁盘,也就是原图保存是一样的。最终会走到DataCacheWriter的write方法:
1
2
3
4
5
6
|
class DataCacheWriter<DataType> implements DiskCache.Writer {
  @Override
  public boolean write(@NonNull File file) {
    return encoder.encode(data, file, options);
  }
}
|
encoder是在上面onResourceDecoded方法中从Registry的resourceEncoderRegistry中根据Resource的getResourceClass返回的Class取到的,如果解码返回一个Bitmap的话,那么此时得到的是一个BitmapEncoder:
 1
 2
 3
 4
 5
 6
 7
 8
 9
10
11
12
13
14
15
16
17
18
19
20
21
22
23
24
25
26
27
28
|
public static final Option<Integer> COMPRESSION_QUALITY =
    Option.memory("com.bumptech.glide.load.resource.bitmap.BitmapEncoder.CompressionQuality", 90);
public boolean encode(
    @NonNull Resource<Bitmap> resource, @NonNull File file, @NonNull Options options) {
  final Bitmap bitmap = resource.get();
  Bitmap.CompressFormat format = getFormat(bitmap, options);
  int quality = options.get(COMPRESSION_QUALITY);
  boolean success = false;
  OutputStream os = null;
  OutputStream os = new FileOutputStream(file);
  if (arrayPool != null) {
    os = new BufferedOutputStream(os, arrayPool);
  }
  bitmap.compress(format, quality, os);
  success = true;
  return success;
}

private Bitmap.CompressFormat getFormat(Bitmap bitmap, Options options) {
  Bitmap.CompressFormat format = options.get(COMPRESSION_FORMAT);
  if (format != null) {
    return format;
  } else if (bitmap.hasAlpha()) {
    return Bitmap.CompressFormat.PNG;
  } else {
    return Bitmap.CompressFormat.JPEG;
  }
}
|
默认的编码质量是90,并且默认的编码格式是如果图片带有透明通道则采用PNG无损压缩,否则使用JPEG有损压缩。如果字节池子存在,则构建一个BufferedOutputStream的输出流,它使用的byte数组来自于字节池子中的,默认字节大小是64KB的缓冲区,每次byte数组达到了64KB的时候,进行同步到底层的FileOutStream中。因为底层的FileOutputStream每次write都会触发一次系统调用,系统调用成本高,多次小块写入会产生:写入时间变长、CPU降速、磁盘碎片、整体编码耗时增加。同时BufferedOutputStream使用的是字节池子中的字节数组,降低GC的触发。
最终流程图如下:
